Airflow Integration
As the number of databases and tables that DBImport is importing, the need to automate the scheduling of these imports grows aswell. This is where the integration with Airflow is so useful. The basic of it is that DBImport generate the DAG to Airflow including all the steps that is required to import the tables defined in DBImport. The result is that no large intevention is needed to schedule and operate an environment with with 10000’s of tables running daily imports.
As described in the Quickstart guide, the command to generate the Airflow DAG is the following:
./manage --airflowGenerate --airflowDAG=<DAG NAME>
Example used on this page
In order to show how a DAG is generated, a demo environment have been setup with one table imported for each import_type with the name having the prefix of tbl_. So a full_append import is called tbl_full_append and they are all in the Hive database demo.
A DAG have also been created in the airflow_import_dags table with the following settings
dag_name |
DBImport_DEMO |
schedule_interval |
None |
filter_hive |
demo.* |
Generate a DAG
In order to generate the DAG as described under Examples above, run the following command:
./manage --airflowGenerate --airflowDAG=DBImport_DEMO
This will create a DAG file in a staging table as configued in airflow_dag_staging_directory. The staging directory is not used by Airflow and the file will never be activated from there. But it’s a good place to check the file to verify that it looks correct. Only needed for very complex DAG’s with many independent tasks and dependencies. But as this is a simple DAG, we add the -w or the –airflowWriteDAG to the command and write the DAG directy to Airflow:
./manage --airflowGenerate --airflowDAG=DBImport_DEMO --airflowWriteDAG
The DAG is now available in Airflow and in paused mode. As soon as it’s un-paused, it can be viewed and started from Airflow.
Default DAG layout
With the DAG just specified with default settings like what is described earlier on this page, a DAG will be created in Airflow and it will look something like this.
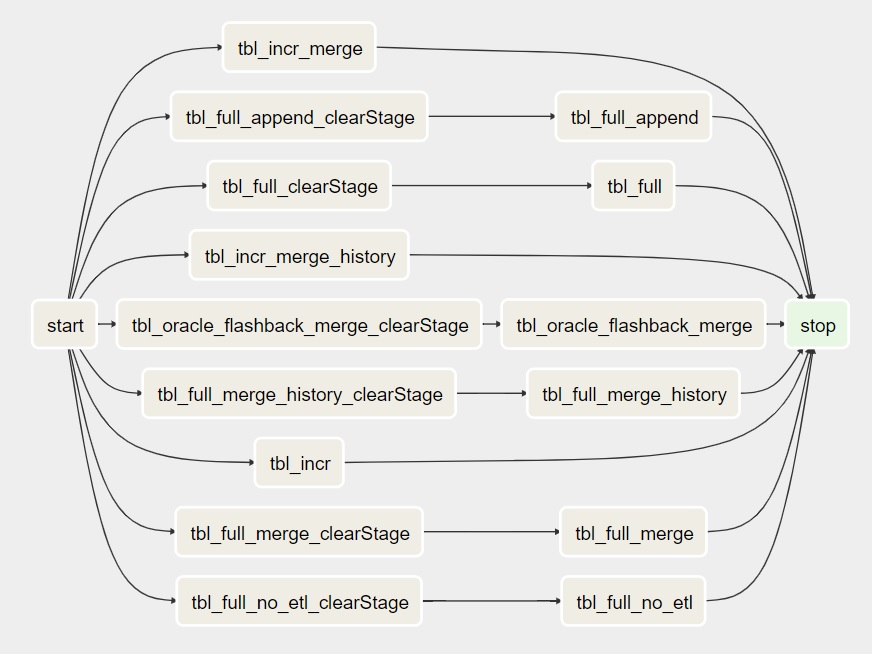
clearStage Tasks
As you can see in the picture above there are a couple of clearStage tasks before the actual import Task. They are created for full imports and will reset whatever stage the previous import was in. This will force the Task to start from the beginning. As it’s a full import, there is no risk of losing data as we read everything anyway. And that’s the reason why there are no clearStage task before the incremental imports. If the previous incremental import failed, we might be in a position where we read the data from the source but unable to insert it into Hive. Forcing a restart of the stage in that situation might result in loss of data.
start and stop Tasks
The start and stop task is always there. Stop is just a dummy Task that is not doing anything. But it’s very useful if another DAG wants a sensor so it continues after this DAG is completed. As stop is always at the end, it’s safe (and usually default) to look at the status of the stop task.
The start task is not a dummy Task. It’s actually running the following command at the start of the DAG:
./manage --checkAirflowExecution
This will check if the airflow_disable configuration is set to 1 or not. If it’s set to 1, the start task will fail and the rest of the Tasks will not run. This is one of the options the operators have to temporary disable all DBImport executions. Useful during for example upgrade of DBImport or system components in order to make sure that no imports are starting.
Run Import and ETL separate
In the airflow_import_dags there is a column called run_import_and_etl_separate. If this is set to 1 and the DAG is regenerated, the result will look something like this.
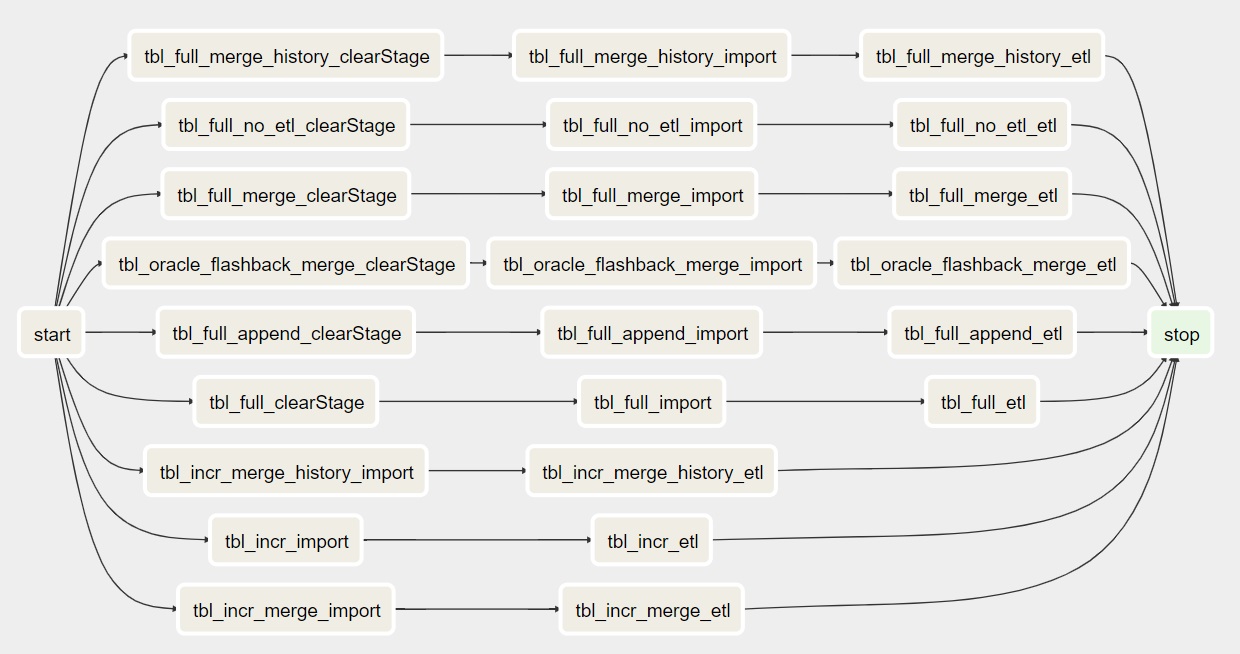
As you can see, the DBImport task is now split into two. One for the actuall import where the communication with the source system is taking place and one for ETL work where the Hive operations are happening. As the Import and ETL Tasks are running as default in separate pools, this is useful in order to minimize the number of sessions against the source system but at the same time have a larger number of sessions in Hive.
Finish all Imports first
In the airflow_import_dags there is a column called finish_all_stage1_first. If this is set to 1 and the DAG is regenerated, the result will look something like this.
Note
In the Legacy version of DBImport the Import and ETL phase was called stage1 and stage2. That’s why the column is called what it’s called. This will most likely change name as soon as the Legacy version is decommissioned.
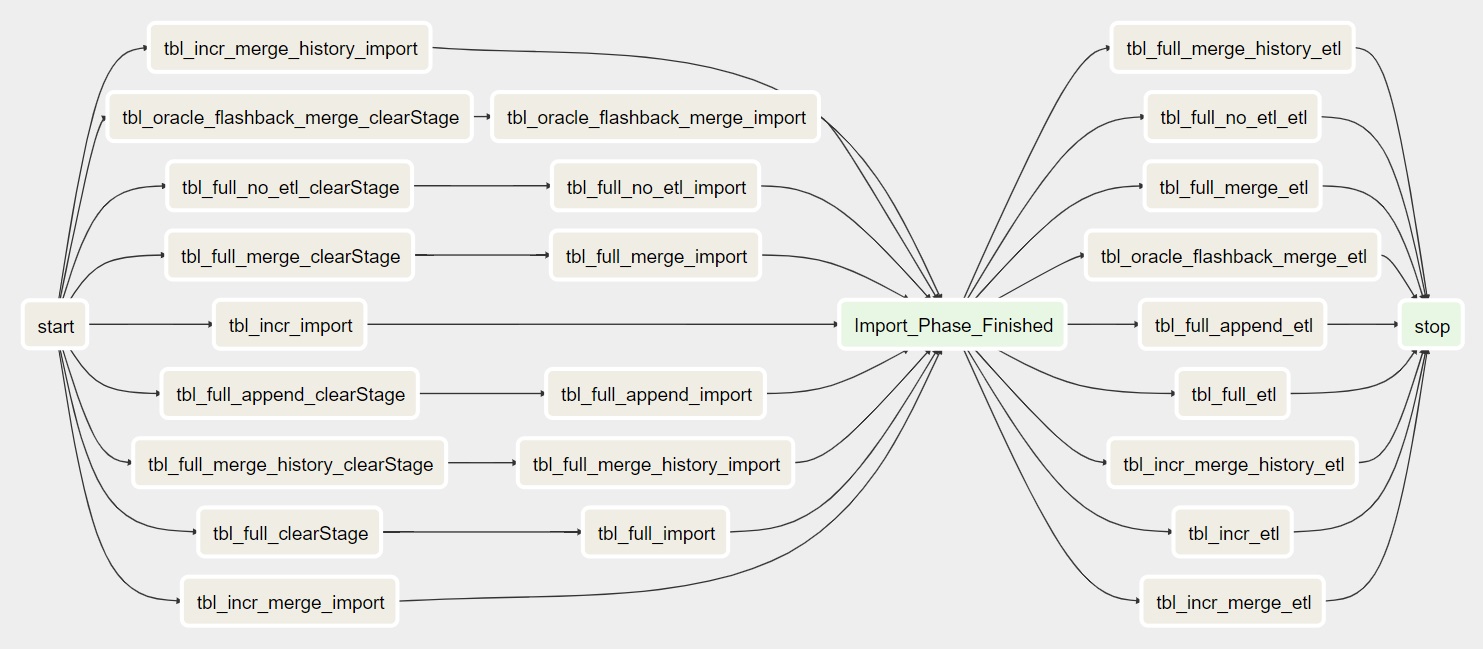
Now a new dummy task is added called Import_Phase_Finished. This Task will force all imports to be completed first before the ETl Tasks is started. This is useful to make sure that all tables is read successfully by sqoop before it’s imported into Hive and made available to the users.
Timezone
When scheduling a job in Airflow, both the time of the jobs and the configured timezone comes into play to determine when the job should be executed. There are two different places to configure the timezone for a job. This also assumes that the Airflow server is running at UTC time. Otherwise that comes into play aswell.
- default valueIn the configuration table, there is an entity called timezone that have a default value of UTC. That means that if nothing is specified on the DAG level, this is the timezone that the job will be scheduled at. This configuration must always exists. If you are running the Airflow server at a non-UTC timezone, just specify this as UTC and no time conversions will happen.
- DAG levelIn all the 4 different DAG configuration tables, there is a column called timezone. Here you can override the default value and use something specific for that DAG. This is usefull if you for example import data from different regions around the world and want to schedule the time in the local time where the datasource exists. If no timezone is needed on the DAG level, put null into this column.
Note
Specify a timezone other than UTC will also handle daylight time savings for that specific timezone.
Customizing the DAG
There are many ways to customize the DAG with additional Tasks. This can be SQL calls to execute after import is completed, sensors to run before the import to make sure that the data is loaded in the source system correctly before the import starts, trigger another DAG after a certain Task is completed or something else that solved each and every ones individual needs.
As there are many options for a custom Task to integrate into the DBImport DAG, we will first describe the place ment of the Task in the DAG. The best way to describe this is to add a number of Tasks to the Demo DAG that we use as an example on this page. The following Tasks have been created in the airflow_tasks table.
dag_name |
task_name |
task_type |
placement |
task_dependency_in_main |
task_config |
|---|---|---|---|---|---|
DBImport_DEMO |
before_main_01 |
shell script |
before main |
/usr/bin/sleep 1 |
|
DBImport_DEMO |
before_main_02 |
shell script |
before main |
/usr/bin/sleep 1 |
|
DBImport_DEMO |
in_main_01 |
shell script |
in main |
/usr/bin/sleep 1 |
|
DBImport_DEMO |
in_main_02 |
shell script |
in main |
tbl_full,tbl_incr |
/usr/bin/sleep 1 |
DBImport_DEMO |
after_main_01 |
shell script |
after main |
/usr/bin/sleep 1 |
|
DBImport_DEMO |
after_main_02 |
shell script |
after main |
/usr/bin/sleep 1 |
With these custom Tasks the DAG will look something like this (custom Tasks marked in blue for better visualization)
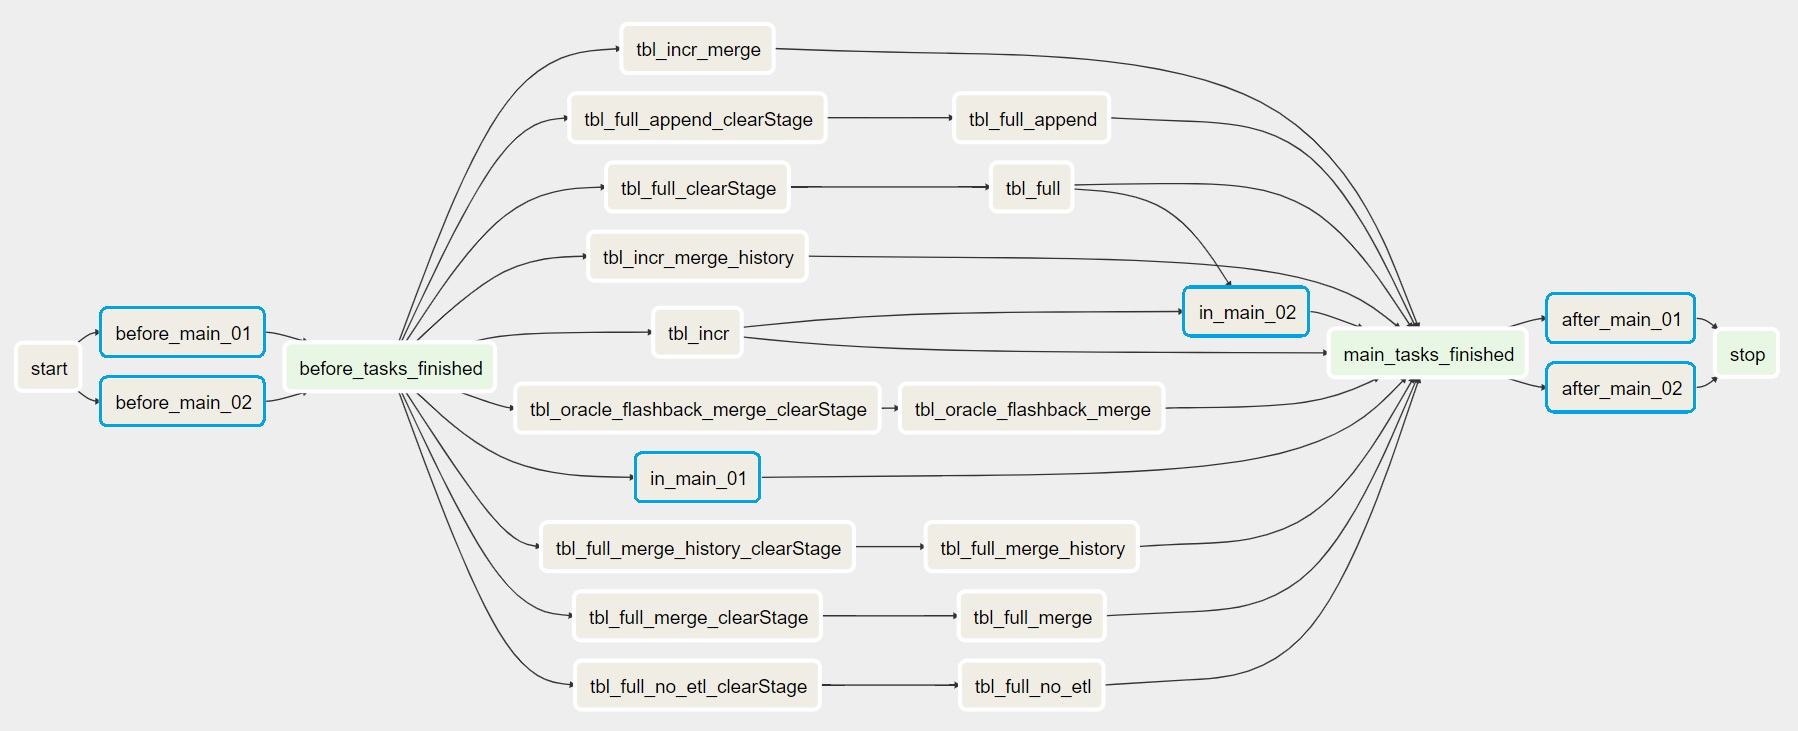
Regarding the placement, these are the options you have
before main |
Tasks will be executed before the real DBImport starts. All these must be successfull in order for the normal imports to start |
in main |
Will be executed in parallel together with the import tasks |
after main |
Once all imports are completed, these tasks will run |
Task dependency in main
For the custom Tasks running with placement in main, you have the option to specify dependencies. It means that you can run a task after one or more imports are completed. In the example above, the in_main_02 task will only run after tbl_full and tbl_incr import tasks are completed successful.
Custom Task configuration
Common for all the custom tasks is the following configuration
airflow_pool |
Name of the Airflow pool to use. Will be created if not exists |
airflow_priority |
The priority of the task |
include_in_airflow |
Enable or disable if this task should be in the configured DAG |
shell script
This task will run a Unix command or a shell script. The script to run is configued in the task_config column
Hive SQL
Executes a Hive query with the help of manage --runHiveQuery=<SQL QUERY>. The <SQL QUERY> is a standard SQL command that is executable in Hive. The SQL Query is configured in the task_config column.
Hive SQL Script
Executes all Hive queries in a file with the help of manage --runHiveScript=<FILE>. The <FILE> is a text file containing one or many SQL Hive commands. The manage --runHiveScript is actually just a wrapper around beeline who will be the tool that executes the <FILE>. The file to use is configured in the task_config column.
JDBC SQL
This will create a Task that executes a SQL Query against a JDBC source defined withing the jdbc_connections table. For that reason, you need to specify the JDBC connection in the jdbc_dbalias column together with the SQL Query in the task_config column
Trigger DAG
This will trigger an execution of another DAG. The name of the DAG to trigger is specified in the task_config column.
DAG Sensor
A DAG Sensor task is the ability to wait for a task in another DAG to finish and continue once that task is successful. The configuration needed is the name of the DAG and Task. Here you have two options. Give the name of the DAG and the name of the Task or only the name of the DAG. If only the name of the DAG is given, it defaults to the stop task that is available in all DBImport DAGs and marks the end of all executed tasks.
task_config column options
<DAG> |
Name of the DAG and will default to stop task |
<DAG>.<TASK> |
Wait for a specific task in a DAG |
There are two other parameters that controlls how ofter to poll for status and for how long the sensor should be doing that
sensor_poke_interval |
The time in seconds between pokes. Too low number will create stress on the Airflow Scheduler. Defaults to 5 minutes |
sensor_timeout_minutes |
The timeout time in minutes until the sensor gives up and are marked as failed. Defaults to 4 hours. |
SQL Sensor
The SQL Sensor executes a SQL query against a Airflow connection. The sensor will keep trying as long as the SQL returns 0 rows or while the first column on the first row contains a 0. An example would be select count(*) from <A TABLE> where last_update > '<A TIMESTAMP>'. If the count returns 0 rows, the sensor will keep on retrying. But when it returns rows, it will be marked as successful and the dependent tasks will start.
The following configurations is available for a SQL Sensor
sensor_connection |
The name of the Airflow connection that will be used to run the SQL. Configured under Admin / Connections in Airflow |
task_config |
The SQL query to execute |
sensor_poke_interval |
The time in seconds between pokes. Too low number will create stress on the Airflow Scheduler. Defaults to 5 minutes |
sensor_timeout_minutes |
The timeout time in minutes until the sensor gives up and are marked as failed. Defaults to 4 hours. |
Multi cluster ingestion
For multi cluster ingestions, this is the sensor that DBImport uses in the background to verify that data is loaded on the slave system beforestarting the import. The sensor_connection that is required is called DBImport and needs to be configured in Airflow connections with the same connection details as DBImport uses to connect to the configuration database. These are all available in the dbimport.cfg configuration file
The actual SQL Query that is executed is:
select count(*) from import_tables
where
   hive_db = '<HIVE DB>'
   and hive_table = '<HIVE TABLE>'
   and copy_finished >= '{{ next_execution_date.strftime('%Y-%m-%d %H:%M:%S.%f') }}'